Do you drool over Instagram photos showing incredible places to park your RV for privacy? How about slipping a cocktail in complete privacy while watching a gorgeous sunset? Then it's time to get some solar power from the sun and head down that little known road you've always wondered where it goes.
If you want to boondock or RV in areas where electrical hookups are limited, you have to add solar to your RV. This is a MUST for off grid stress free boondocking. There is a huge sense of freedom you get when the sun is out and you know your power is unlimited.
Do your research first and read articles, blogs and watch Youtube videos before embarking on this project. It might seem overwhelming at first but once you have it installed, you'll be set for years. Trust me, you can do this! Solar doesn't have to be expensive or complicated if you follow the steps recommended by hundreds of Rver's.
There are 5 basic parts to a solar power system.

- Sun!
- Receiving solar power - Sun to panels
- Transmission of solar power - Power from panels to the Charge Controller
- Storage of solar power - Batteries
- Usage of solar power - Inverter 12 volts battery to house power & 12 volt DC to 120 volt AC inverter loads
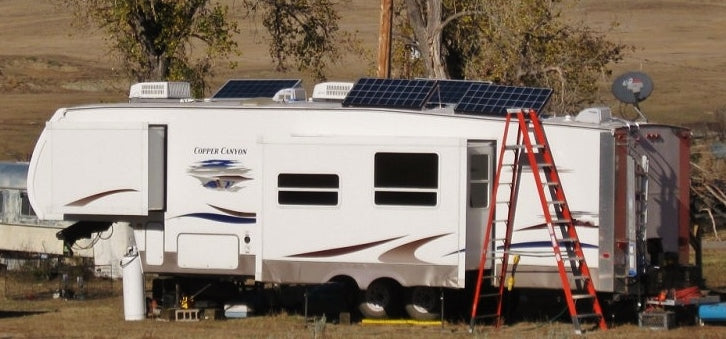
Outside of the Sun, 4 elements must be installed properly or your system will not operate at full capacity. On our RV 32ft trailer, we installed the ACOPOWER 500W 40A 12V Poly Solar Power Kit and this system has delivered 100% of the time. Solar kits typically include the controller, panels and cables so do yourself a favor and get a kit to avoid brain overload. They've done the hard work for you plus a kit is very cost effective as well. They run anywhere from $200 to $1000 depending on your needs.
When you look at the each of the 4 components, panels, batteries, controller and wire/connectors, the parts are just as important as the installation steps. Make sure all your parts are recommended and lean toward top of the line. Again, consider this an investment to your RV and long term use.
Solar Panels - Which one? Portable, mounted or both?

A portable solar panel might be the best answer for you, especially if your solar usage is light. We recommend USA made SunPower 105W Foldable Solar Panel Kit. It's very lightweight, less than 8 pds and works well with small campers, vans, cars and boats. Portables are very simple to use. Pop them up, connect to your battery and forget about them for a few hours. It's like adjusting your camping chair, just pivot the panel as the sun moves to keep it charging.

More solar power equals more time boondocking and less time being tied to hookups in crowded campgrounds. You will need 2-3 panels for 20 Kilowatt of hours per day. This will run small appliances and have have enough juice to power your laptop. If you want to run the microwave or air conditioner, you'll need to add the generator to boost the power. The downside to mounted panels is shade so if you are in a mostly shaded area, your power source won't be 100%. That's where a portable solar panel can come in handy and having both ensures you are covered in the shade. Tilting your panels will get you the maximum power at 90-degrees to the sun. This improves the solar system’s power by 50% in the wintertime.
Quick overview on Watt Needs
100 Watts - Small camper = little energy demands
200 Watts - Full time living vans and seasonal light campers
300 Watts - Mid size Rvs with regular energy needs = LED lights, toilet fan, light heater/refrig usage, USB Recharging.
400 Watts - Off grid living - small Rv's/vans
600 Watts - Midsize RV's - will run TV, charge laptops, coffee maker, fridge
800 Watts - Class A's off grid power needs
Batteries - These are critical to your storing your solar power. Do not cheap show this step. While economical lead acid batteries appeal to first time Rvers and RV manufacturers, you will spend battery money over and over again by replacing them so do yourself a favor and consider it a small investment to happy Rving. In the long term, it's worth a few more dollars upfront than replacing them again and again.

But where to start?
AGM Deep cycle batteries are the workhorse of the battery world and a good choice for solar. They provide power for extended periods and an ideal solution for long term use. Another type of battery, the hybrid battery, is also very good. These are known for golf cart and marine use because they can run for long periods of time and switch between energy sources. The best choice, Lithium, is the priciest battery option but are considered the most efficient with charge cycles and is the longest lasting battery on the market. One downside to Lithium is they can't charge below freezing so this can be a major consideration based on your location and seasonal use. They also charge differently than lead acid batteries so many charging components won't work.

Wiring - Another critical step in setting up your RV Solar System. Again, determine your solar needs. This includes time off grid needed and size of RV just to start. Size of wattage needed will determine the complexity of the wiring system. The most important part to any wiring system is the connections are run as short as possible and clean. Use the charts available to you on the internet based on your unit and kit. Test and retest each connection. Follow the directions. Sounds simple but the details on wiring are critical to your success. Wiring diagrams are based on watt solar setup. The smaller the wattage, the easier to connect and setup. This is ideal if you start with a smaller usage and budget need. You can always scale up in the future.
Solar Charge Controllers
Protect your batteries! A solar charge controller is similar to a battery charger. It regulates the current flowing from the solar panel to the battery bank and protects from overcharging. There are two types of controllers, PWM and MPPT. So which is better or why chose one over the other?
Here's how to match which one is right for your solar system.
PWM - Pulse Width Modulation

- Perfect for smaller systems (vans, tiny homes, small RV's)
- Good for warmer sunny climates
- Less expensive
- Provides a steady output through a series of short charge pulses to the battery i e trickle charge.
- Use with solar panels of a maximum power voltage of up to 18V for charging a 12V battery.
PWM charge controllers trickle charge a small amount of power, keeping your batteries full. This is the perfect fit for the smaller system that uses little energy. Keep in mind the solar panel system and batteries must have matching voltages as the current is drawn out of the panel at just above the battery voltage.
Many PWM charge controllers come with a diverse set of extra features. Most charge controllers can be used with a 12V or 24V battery or battery bank and comes equipped with self-diagnostics and electronic protection functions to prevent damage from installation mistakes or system faults.
For MPPT - Maximum Power Point Tracking

- Use for larger systems where the additional 20% or more energy harvesting is worthwhile. (off grid cabins, larger RV's)
- Best for those living/visiting cloudy colder climates
- Use when the solar array voltage is higher than the battery voltage
- Monitors and adjusts to regulate the current from the solar system.
- Limits the output to ensure batteries don't overcharge.
MPPT are most efficient when using the full power of the solar panels while charging your batteries. The controller adjusts as the sun and clouds move. If it's cloudy, the MPPT charge controller will decrease the amount of current drawn to keep the desired voltage. When the sun comes back out, the controller will pull more current from the solar panels. Our RV has the Midas 40A MPPT Solar Charge Controller with Remote Meter. We love our state parks and don't always have hookups. It's critical as remote workers we have solar power when we don't have access to direct power.
Whichever controller you chose, mount it as close as possible to your battery bank with the shortest wiring as possible. I can't tell you how important wiring is! Resistance in the wiring will kill your amps moving into your batteries. The longer it takes the current to reach your power source, the less amps get stored.
Battery Monitors, Inverters, Circuit Protectors OH MY
In a nutshell, these items are critical and will ensure your solar system perform at it's best while keeping everything safe.
Battery Monitor
While you don't need a battery monitor, it helps to track the watts of solar coming in and your solar usage. All important to know if your laptop is dying and you have a full charge available. No need to run to Starbucks unless you need a shot of caffeine. Solar is freedom baby. Battery monitors are easy to understand and read. It shows your battery state of charge, (higher is better) and how many amps are going in and out of the batteries. Simple stuff and they run anywhere from $75 to $200. They are easy to mount as well.
Inverters
First thing first, converters and chargers need to be as close to the battery banks as possible. RV batteries generally provide 12 volt DC power but many of the appliances running in your RV require 120 volts AC so a power inverter is a must. If you want to use a TV, coffee maker, laptop, etc., and/or you want to be able to run more than one item at a time, you need to go with a pure sine inverter. They run $150-$500 depending on the watt. The wattage depends on usage. Do you want to run the TV and microwave at the same time or are you happy with the lights on?
Circuit Protectors
Be safe! You need circuit protection in all phases of your solar power system. From your panels to the house loads. This is a very big thing and could mean the difference of a blown fuse or a burning RV. DC power is nothing to leave unprotected, this is a must! Along with this you need some way to channel that power and to stop it when doing service or replacing parts in the system. Also, if you run two battery banks you need switches from one bank to the next.
How you hook up your inverter to your 120-volt AC system will depend on how you use it. Some RV'ers run it using a transfer switch and run the whole RV 120 volt AC system with their inverter. We run ours with an independent inverter supply line with its own outlets so we do not make a mistake powering up the wrong loads and frying out the inverter.
Our final piece of advice, or step if you will...ASK someone to make sure everything is installed completely. The RV community is very helpful and full of great advice. Many have been in your shoes and are more than happy to share their learning experiences. There are so many resources available through social media and YouTube videos that getting free energy from the sun for your electrical needs is easy and FREE, after installation of course.
Happy Boondocking everyone!